When you email volunteers through Bloomerang Volunteer, you can use a sender address from your domain. For example, if your domain name is example.org, you might email supporters from an address such as info@example.org.
Before Bloomerang Volunteer can send emails on behalf of your domain, you must authenticate your domain.
Email authentication is how your organization proves your emails come from your domain and not from a scammer impersonating you. Email authentication helps protect your organization and volunteers from phishing and spoofing, and it also helps reduce spam. When you authenticate a domain in Bloomerang Volunteer, you set up a type of email authentication known as DomainKeys Identified Mail (DKIM).
This is a technical task, and you might need a little help from your IT support provider. In this article, we’ll help get you started.
Note: You don’t have to complete the steps in this article if:
• Your domain status is already Authenticated.
• You send emails in Bloomerang Volunteer from an email service provider (@gmail.com, @yahoo.com, @comcast.net, or others). Email service providers handle DKIM authentication for you.
In this article:
- What is DKIM and Why Is It Important?
- Can I Set up DKIM Myself?
- Download a DKIM Key
- Add a DKIM Key to your DNS Records
- Next Steps
What is DKIM and Why Is It Important?
DomainKeys Identified Mail (DKIM) adds a cryptographic key (a digital signature) to your outbound emails. The key tells email service providers that the server for your domain produced the email.
When you set up DKIM email authentication:
- Volunteers are more likely to receive your emails. When your domain uses DKIM, your email reputation score is more likely to be high. Email service providers that your volunteers use are more likely to deliver your email.
- You protect your organization and volunteers. It’s less likely scammers can impersonate your domain name and organization.
If you don’t set up email authentication, volunteers might not receive your emails. As your email reputation score decreases, email service providers might mark your emails as spam, or even bounce or block them.
After you set up DKIM, email service providers know that Bloomerang Volunteer, and our email provider Amazon AWS, are authorized to send emails on your behalf and the email is legitimate.
Note: Starting February 1, 2024, Google and Yahoo require bulk senders to follow new email authentication requirements meant to increase email security and reduce spam. DKIM is now required if you send emails in Bloomerang Volunteer and use a sender address from your own domain. If you don’t set up DKIM, Google and Yahoo might bounce or block some emails you send to Google and Yahoo addresses.
Can I Set up DKIM Myself?
In this article, we’ll help you download your DKIM key from Bloomerang Volunteer.
After you download your DKIM key, you’ll need to configure some domain settings outside of Bloomerang Volunteer. To do this, you must log in to your domain provider account and add the DKIM key to your DNS records. Bloomerang cannot add the DKIM record for you.
If you’re not comfortable editing your domain settings, ask your domain provider or IT support provider for help. You can send them the DKIM key you download from Bloomerang Volunteer.
Download a DKIM Key
In Bloomerang Volunteer, generate and download a DKIM key for your domain. Our email service provider (Amazon SES) looks for changes to your DNS records within 72 hours.
If Amazon SES doesn't find changes to your DNS records within 72 hours, the DKIM request status shows as Expired in Bloomerang Volunteer.
Tip: If the DKIM request status changes to Expired before you can update your DNS records, you can always resubmit the DKIM request, which resets the clock. The key remains the same.
To generate and download a DKIM key:
- In Bloomerang Volunteer, go to your organization or opportunity settings.
- Click Email Communications.
- Click Authenticate Domains.
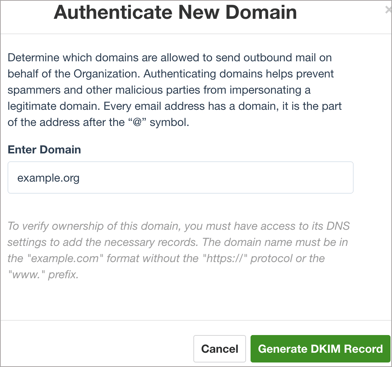
- Click Authenticate New Domain.
- Enter your domain name, such as example.org. Don’t enter
https://orwwwbefore the domain name.
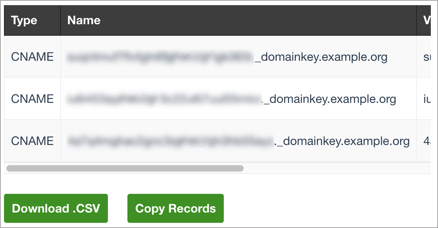
- Click Generate DKIM Record. Three CNAME records appear.

- Choose how to receive the DKIM key:
- Download .CSV — To download a comma-separated (.CSV) file to your computer.
- Copy Records — To copy the key to your computer’s clipboard. You can paste the key to a text file and save the file.
- Click OK. In Bloomerang Volunteer, the status is now Pending.

- Do one of the following:
- If you’re comfortable editing your domain’s DNS settings, add the DKIM key to your DNS records.
- Send the DKIM key to your IT support provider and request assistance.
Redownload a DKIM Key
If the DKIM request status isn’t Expired, you can download the DKIM key again while the domain status is Pending. If the domain status is Expired or Failed, you must resubmit the domain request.
To redownload a DKIM key:
- In Bloomerang Volunteer, go to your organization or opportunity settings.
- Click Email Communications.
- Click Authenticate Domains.
- Hover over the domain.
- Click Actions.
- Click Show Setup Details.
- Click Download .CSV or Copy Records.
Add a DKIM Key to Your DNS Records
Next, add the DKIM key to your DNS records for your domain.
Before you begin, open the DKIM key you downloaded from Bloomerang Volunteer. You’ll need all three CNAME records in the DKIM key. Each CNAME record includes a Name and Value pair.
The steps you take to update DNS records depend on your domain provider. To help you get started, we provide general instructions. For detailed instructions, search for DNS management information from your domain account provider. For example, Wordpress.com, Wix, and Squarespace provide instructions.
To add a DKIM record to your DNS settings:
- Log in to your domain name provider account.
- Open the DNS settings.
- Add a new CNAME record.
- In the CNAME record, paste the Name you copied from the first row in your DKIM key. Your domain provider might use a different name for this setting (Host or Host Name).
- Paste the Value you copied from the first row of your DKIM key. Your domain provider might use a different name for this setting (Points To).

- Add a second CNAME record. Use the Name and Value from the second row in your DKIM key.
- Add a third CNAME record. Use the Name and Value from the third row in your DKIM key.
- Verify that the Name and Value that you pasted to each CNAME record exactly match the information in the DKIM key that you downloaded from Bloomerang Volunteer.
Important: You must add the name and value information exactly. Do not include any extra spaces or characters. - Save your changes. Your DNS records should now include three new CNAME records.
Next Steps
- Optionally, you can verify your DKIM key was added correctly to your DNS records.
- Wait for Bloomerang Volunteer to authenticate your domain. For information about how to check the domain status, read View the Domain Verification Status.
- After the domain status changes to Authenticated, you can fully verify email addresses from that domain in Bloomerang Volunteer. In email templates, you can change the From Sender to a Fully Verified email address.
You can remove a domain from Bloomerang Volunteer. For more information, read Remove an Authenticated Domain.
Related
- Resubmit a Domain Authentication Request
- Verify a Sender Email Address
- Change the Sender or Reply-To Email Address
