
When you create an opportunity, you can also create an unlimited number of venues and locations for the opportunity. Venue information helps with engagement – volunteers are more engaged when you provide detailed information about your opportunity.
In this article:
- About Venues
- About Locations
- Create a Venue and Location
- Copy a Venue from an Opportunity
- Edit or Delete a Venue or Location
- Best Practices
About Venues
A venue is the place where the opportunity happens, such as a building, facility, site, area, or even a virtual space.
When you create a shift, venues are always optional. Your event might not need a venue designation. For example, if you name the opportunity Warehouse Work, and all work takes place in the warehouse, a venue might be unnecessary.
About Locations
A location is a specific area within a venue, such as rooms or floors in a building, stages or tents at an outdoor festival, a box office, or tables in a library. You can add a location to a shift to let volunteers know exactly where they’ll work.
When you create a venue, locations are always optional. Your event might not need a location. For example, if a food bank warehouse is the venue, and there are no other locations in the warehouse, you don’t have to add a location. Or, you might host a virtual event and create a venue named Virtual without a location.
Create a Venue and Location
You can manually create a new venue or copy one from another opportunity.
To manually create a venue:
- Open your organization. If you are in more than one organization, open the organization where you want to create a venue for an opportunity.
- On the organization home page, click Opportunities.
- Open the opportunity.
- Click Venues & Locations
 .
. - Click Create New Venue.
- Enter the Venue Title.
- Enter a Nickname or select Use Venue Name as Nickname.
- Enter a Description, such as the venue address and other information.
Tip: In the recruitment settings for the opportunity, you can upload helpful documents. Upload a map that volunteers can reference through the web or mobile app. - To copy the venue address from the opportunity settings, keep Use Same Address as Opportunity selected.
- To enter an address, clear the Use Same Address as Opportunity checkbox.
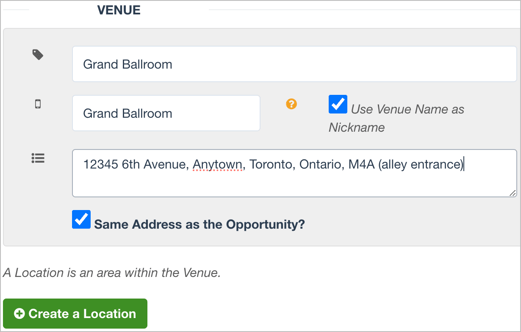
- (Optional) Click Create a Location and:
- Enter a Location Title.
- Enter a Nickname or select Use Venue Name as Nickname.
- Enter a Description, such as the room name or number. Be precise to help volunteers find the venue and arrive on time.
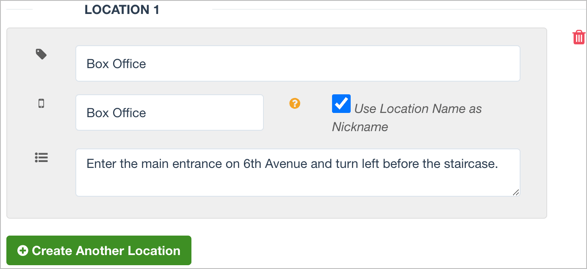
- If your venue has multiple locations, click Create Another Location.
- Click Save.
Tip: You can also create venues and locations when you create shifts.
Copy a Venue from an Opportunity
To save time, copy a venue from another opportunity. This also helps keep your venue information consistent across opportunities.
To copy a venue from another opportunity:
- Open your organization. If you are in more than one organization, open the correct organization for the opportunity.
- On the organization home page, click Opportunities.
- Open the opportunity.
- Click Venues & Locations .
- Select Add Venues > Copy Venue from Another Opportunity.
- From the Select Past Opportunity list, select an opportunity.
- To add the venue, click the arrow.
The venue appears in the Current List.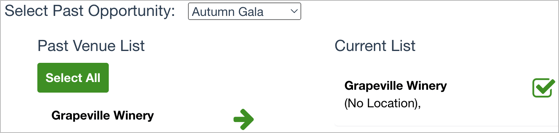
- Click Add.
Edit or Delete a Venue or Location
After you create a venue or location, you can edit or delete it. You can also add more locations to a venue.
To edit a venue or location:
- Open your organization. If you are in more than one organization, open the correct organization for the opportunity.
- On the organization home page, click Opportunities.
- Open the opportunity.
- Click Venues & Locations .
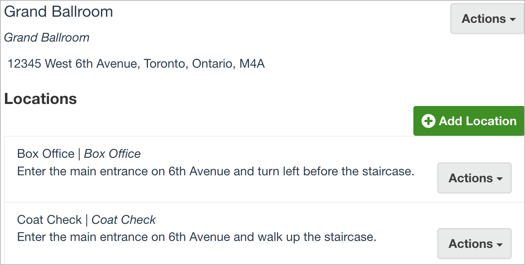
- To edit a venue, select Actions and Edit Venue.
- To edit a location, from the Location section, select Actions > Edit Location.
- To add a location, click Add Location.
- To delete a venue, select Actions and Delete Venue. Deleting a venue also deletes all of its locations and updates all associated shifts to No Venue or No Location.
- To delete a location, from the Location section, select Actions and Delete Location. Deleting a location updates all associated shifts to No Location.
- To delete all shifts associated with the venue or location, select Also Delete Associated Shifts. Deleting the associated shifts unschedules all volunteers assigned to those shifts.
- Click Delete Venue or Delete Location.
- To confirm the deletion, enter “Delete” in the text box.
- Click Delete Venue or Delete Location a second time.
Best Practices and Tips
- For an opportunity with several venues, and multiple locations in each venue, create the venues and locations before you create the schedule.
- If your space requires more than a two-layer hierarchy, such as a facility, room, and floor, build the facility as the opportunity, venues as the floor, and locations as the rooms. For example, for an Olympic-sized opportunity, create an opportunity for each sports facility. Venues could be floors in the facilities, and locations could be stations on each floor.
- In the schedule settings, you can filter the List View and Calendar View by venue. In List View, click
 to show or hide the Venue column. In Calendar View, click
  to show or hide the Venue - Location information.