
This article explains how to manually schedule volunteers for shifts. You can also allow volunteers to select their own shifts.
In this article:
Before You Begin
If you collect availability information, Roster Mode can use that information to help you to manually schedule staff and volunteers.
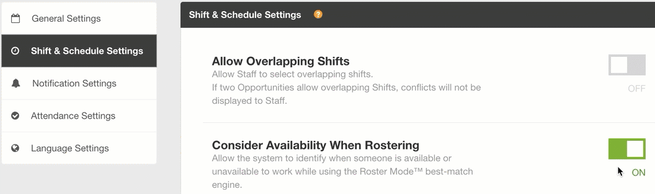
Each opportunity has a Consider Availability When Rostering option, which is on by default. If you keep this option on, availability conflicts and filters appear in Roster Mode. Also, an availability option appears in the Volunteer Scheduling Conflicts filter, which you can select from the Shift-Based and Schedule-Based filters.
If you don’t collect availability information for an opportunity, we recommend that you turn this setting off. You can change this setting for an individual opportunity or in bulk for multiple opportunities.
To change the Consider Availability When Rostering option for an individual opportunity:
- Open your organization. If you are in more than one organization, choose the organization for the opportunity you want to have updated settings.
- Click Opportunities.
- Click the opportunity.
- Select General Settings
 .
. - From the left navigation menu, select Shift & Schedule Settings.
- Turn off or on Consider Availability When Rostering. By default, this option is on.
To change the Consider Availability When Rostering option for multiple opportunities:
- Open your organization. If you are in more than one organization, open the correct organization.
- Click Opportunities.
- Select one or more opportunities.
- Click Take Action.
- Select Edit General Settings.
- Select Consider Availability When Rostering and turn it Off or On. By default, this setting is on for all opportunities.
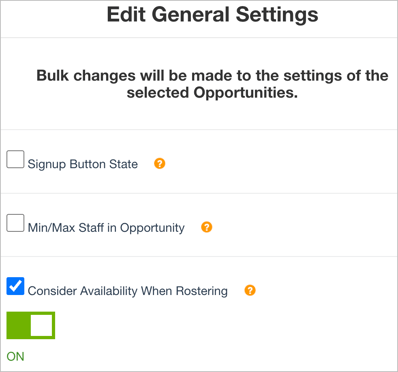
- Click Save.
If you turn off this option, availability-related settings and indicators no longer appear:
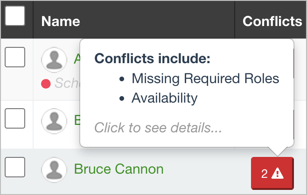
- Roster Mode filters: The checkboxes And Are Available, And Are Unavailable, and Have Not Filled in Their Availability do not appear.
- Roster Mode list: Availability conflicts do not appear in the Conflicts column.
- Shift-Based and Schedule-Based filters: In the Volunteer Scheduling Conflicts filter, Availability does not appear.
Schedule Volunteers
In an opportunity, you can schedule from either of these pages:
- Schedule page: Select shifts first. View volunteers who match and add them to shifts.
- Volunteer List page: Select volunteers first. View shifts that match and add volunteers to those shifts. When you schedule from the Volunteer List, you can add additional columns and filters that help you make better placement decisions.
Or, you can use Roster Mode while managing multiple opportunities at once from the Central Schedule page.
Schedule from the Schedule Page
To manually schedule volunteers from the Schedule page:
- Open your organization. If you are in more than one organization, choose the organization for the opportunity where you are scheduling volunteers.
- Click Opportunities.
- Open the opportunity.
- Click Schedule
 .
. - Select one or more shifts.
- Click Roster Mode. By default, the best matched volunteers appear. Volunteers are a Best Match only when their roles, qualifications, and availability all match this shift.
- To view volunteers who are not a best match, select one of these options:
- Volunteers With Matching Roles
- Volunteers With Matching Qualifications
- Show All Volunteers
- If you select one of the options in Step 5, clear one or more availability-related checkboxes to ignore availability and conflicts.

- Select one or more volunteers. You can also enter a name in the Search by Name box. Indicators in the Conflicts column show you which volunteers are a best match and which have conflicts.

- Click Add Volunteers to Selected Shifts.

- Select one or more roles to add volunteers to.
- Click Add.
The volunteers are added to the shifts and roles.
Schedule from the Volunteer List Page
When you schedule from the Volunteer List, you can add filters and dynamic columns for availability, form question responses, historical hours and shifts, and more. These filters give you more context so you can make better placement decisions.
To manually schedule volunteers from the Volunteer List page:
- Open your organization. If you are in more than one organization, open the correct organization.
- Click Opportunities.
- Open the opportunity.
- Click Volunteer List
 .
. - Select one or more volunteers.
- Click Roster Mode. By default, Roster Mode shows you the best matched shifts for the selected volunteers.
- To view volunteers who are not a best match, select one of these options:
- Shifts With Matching Roles
- Shifts With Matching Qualifications
- Show All Shifts
- Select one or more volunteers. You can also enter a shift name in the Search Schedule box.
- Click Add Volunteers to Selected Shifts.
- To confirm, click OK.
- If the shift is over-scheduled, but to add volunteers anyway, click Continue.
The volunteers are added to the shift.
Schedule from the Central Schedule Page
From the Central Schedule page, you can roster volunteers for multiple shifts and opportunities across your organization without opening opportunities individually.
To manually schedule volunteers from the Central Schedule page:
- Open your organization. If you are in more than one organization, open the correct organization for the volunteers you are scheduling.
- On the organization home page, click Central Schedule.
- Filter the Scheduled Roles table by scheduled role status, opportunity, and date range as needed.

- To open a shift window, click a result in the Shift Title, Shift Status, Shift State, or Scheduled Role table columns.
- In the shift window, select a scheduled role.

- In the Volunteers section, click Scheduled to add volunteers to the shift. Or, click On Waitlist to add volunteers to the waitlist for the shift.
- Click Roster Mode. By default, volunteers appear whose roles, qualifications, and availability all match the shift.
- To view volunteers who are not a best match, select one of these options:
- Volunteers With Matching Roles
- Volunteers With Matching Qualifications
- Show All Volunteers
- If you select one of the options in Step 7, clear one or more availability-related checkboxes to ignore availability and conflicts.

- Select one or more volunteers. You can also enter a name in the Search by Name box. Indicators in the Conflicts column show you which volunteers are a best match and which have conflicts.

- Click Add to Shift or Add to Waitlist.
- If you add volunteers with conflicts, a confirmation message appears. Click Ok to add volunteers to the roles, qualifications, and shifts.

- In the shift window, click Done save your changes.
The volunteers are added to the shifts and roles.
Repeat these steps for more shifts or opportunities on the Central Schedule page as needed.
Note: You can also roster from the shift window within an opportunity. From the opportunity schedule, click the appropriate Shift Title. A shift window appears that shows volunteers and shifts with matching roles, qualifications, and availability.
View the Volunteer List for a Shift
To view a list of volunteers who are scheduled for a shift:
- Open your organization. If you are in more than one organization, open the correct organization for the volunteers you're viewing.
- Click Opportunities.
- Open the opportunity.
- Click Schedule .
- Select a shift.
- From the Shift Details list, click a role.
Scheduled volunteers appear in the list.