
To save time and increase volunteer engagement, create email automations. Email automations send relevant information to volunteers based on specific actions and tags.
You can create different types of email automations. For descriptions and examples of each, view What are Email Automations?
In this article:
Before You Begin
Before you create automations, you can set up one or more email templates. You can also set up templates while you create an automation. Edit a default template or create a new template in the organization or opportunity.
View and manage your email templates in the Template Library.
Create Email Automations
Create email automations from the organization or opportunity settings.
Tip: To save time, copy automations from your organization or another opportunity. You must be in the opportunity settings to copy automations. You can edit automations that you copy.
To create a new email automation:
- From your organization or opportunity settings, click Email Communications.
- Click Manage Automations.
- Select Create New Automation. If you’re in the opportunity settings, you can also select Copy Automation From Another Opportunity or Copy Organization Opportunity.
- Click Add Automation.
- To select one of these automations, click Get Started:
- Pre/Post Shift — Remind users about upcoming shifts or thank them after a completed shift.
- Signup Workflow — Assure users they signed up or completed a signup step successfully, and tell them what to expect next.
- Welcome — Welcome users to the organization or opportunity and tell them what to expect next.
- Birthday — Wish users a happy birthday to show your appreciation.
- Recognition of Achievement — Recognize users as soon as they reach certain milestones based on the amount of hours worked, tenure, or annual work anniversary.
- Re-Engagement — Encourage users that haven’t interacted with your organization in a while to reconnect based upon how long it has been since their last login or contribution, or based on their inactive contribution status.
- To select an existing template for this email, click Select a Template. To make a new template within your automation, click Create Template.
- If you create a new template, enter the template information and click Save as New.
- Enter the Template Title.
- Enter the Description.
- In the Share Settings list, select Public or Private.
- Click the Add to Folder drop-down list and select a folder.
- To save the template to the automation, click Save & Add to Automation. If you click Save instead, you can continue to edit the template without adding the template to the automation.

- You can also click Save or Save & Add to Automation on the Create Template window.

- To select the recipients:
- Click Select Recipient Options.
- From the first drop-down list, select Send To or Do Not Send To.
- From the next drop-down list, select Everyone, Users With Any of These Tags, or Users With All of These Tags.
- If you select to send based on tags, select one or more tag categories or tags.
- Click Save.
- For automations except the Welcome automation, select when to send the email:
- Pre/Post Shift — Select the amount of time before or after the shift ends.
- Signup Workflow — Select to send after the Last (or Only) Enabled Step or After a Specific Step. If you select the latter option, you must also select a step.
Tip: To send emails for more than one signup step, create separate automations. - Birthday — Select a time on the user’s birthday
- Recognition of Achievement — Choose which milestone to recognize, number of hours required to achieve the milestone, and timeframe of accumulated hours.
- Re-Engagement — Choose which metric to use.
- Enter a title for the automation.
- Click Create.
If a similar automation exists, a warning message appears. Click OK to continue. - To activate the automation, in the Status column, change the toggle to Active. By default, new automations are paused.
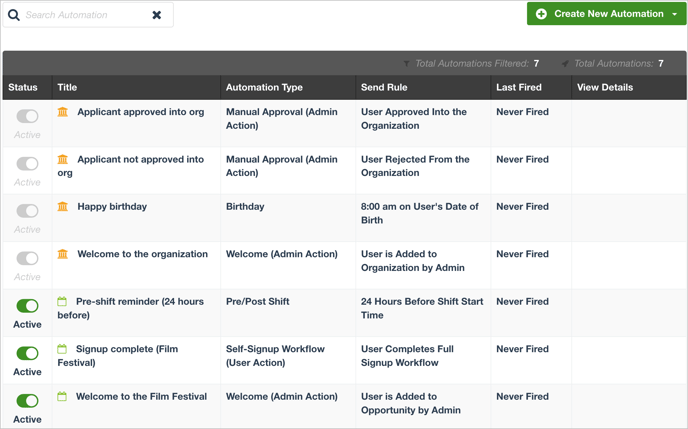
Manage Automations
You can preview, edit, activate, pause, or delete an automation. You can also view a summary of the automation settings and delivery information.
Where you manage automations depends on the type of automation:
- Organization automations — Manage at the organization level.
- Opportunity automations — Manage at the opportunity level, and also at the organization level in some cases. At the opportunity level, you can manage only opportunity automations created in or copied to that opportunity. If you create opportunity automations at the organization level, you can activate and manage those only at the opportunity level. If you create opportunity automations at the opportunity level, you can activate and manage those at the opportunity or organization level.
To preview and edit automations:
- From your organization or opportunity settings, click Email Communications.
- Click Manage Automations.
- Hover over the automation and click Details.
- To preview the message that users will receive, click Preview Message.
- To view a summary of the automation settings, click Details.
- To edit an automation, click Edit. You can change the template, recipients, when the email sends, and the automation title.
To activate automations:
- From your organization or opportunity settings, click Email Communications.
- Click Manage Automations.
- To activate an automation, in the Status column, change the toggle to Active.
Note: In the organization settings, you cannot activate automations that include opportunity information. Activate Pre/Post Shift and Signup Workflow automations in the opportunity settings. If an automation doesn’t appear in an opportunity, you can copy it to the opportunity.
To pause or delete automations:
- From your organization settings, click Email Communications.
- Click Manage Automations.
- To pause an automation, in the Status column, change the toggle to Paused.
- To permanently delete an automation, hover over the automation and click the Delete Automation icon.
Note: In the organization settings, you cannot pause or delete automations that include opportunity information. To pause or delete Pre/Post Shift and Signup Workflow automations, go to the opportunity settings.
Copy Automations
To save time, copy automations to an opportunity from the organization or other opportunities. You can edit copied automations.
To copy an email automation to an opportunity:
- From the opportunity settings, click Email Communications.
- Click Manage Automations.
- Select Create New Automation.
- Select Copy Automation From Another Opportunity or Copy Organization Opportunity.
- Click Add Automation.
- Edit the automation settings, if needed.
View the Sent History
To understand who received which email and when, you can view delivery data in the sent history. You can also view who didn't receive an email because they unsubscribed or because email delivery failed.
To view the sent history:
- From your organization settings, click Email Communications.
- Click Sent History.
- Hover over the email and click Details.
- To view the message that users received, click Preview Message. Select a recipient to view the message as that recipient.
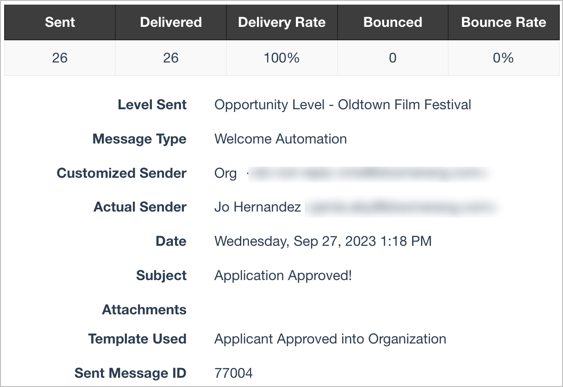
- To view delivery information and data, click Details. You can view the total number of messages sent, the delivery total and rate, the bounce total and rate, and content information.
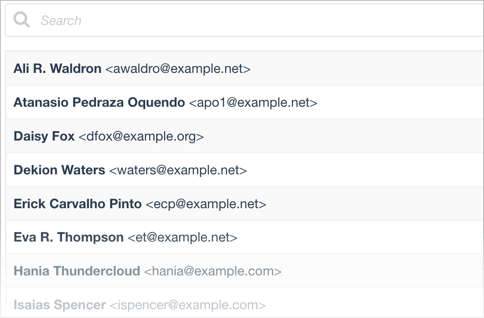
- To view a list of recipients, click Deliveries. To search for a recipient, enter some or all characters in the recipient's name or email address.
- To view a list of recipients who didn’t receive the email because of delivery failure or because they unsubscribed, click Bounces.