
The send Personal Schedule and Shift Confirmation Requests can be used by Managers to ensure that their volunteers are up to date with their shifts, as well as confirming that they will be attending any Shifts they have registered for.
Managers can make custom Schedule Based Messages using Special Links and the Insert Schedule functions of the Send Message pop-up. This article will walk you through creating your own Custom Schedule Based Messages.
Note: If an individual has unsubscribed from Bloomerang Volunteer emails, they will not receive custom messages.
If anyone in the recipient list has unsubscribed from email communications, you’ll receive a prompt that lists which email addresses won’t be sent the message. You can then choose to contact them via a different method.
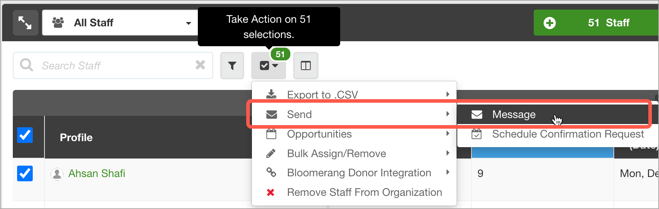
Step 1: Select & Send Message
First, select the volunteers to whom you want to send the invitation email. Once they are selected, use the take action dropdown, and under "Send," choose "Send Message." This can be done at the Organization level or from within an Opportunity.
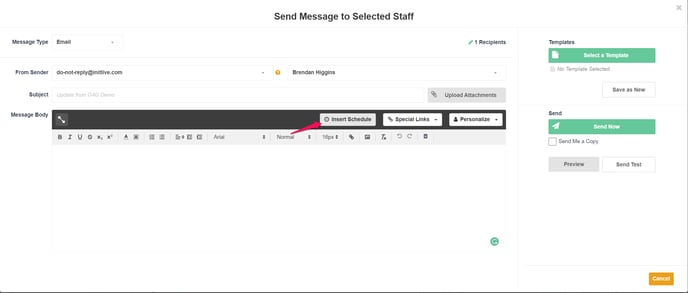
Step 2: Create Your Message
The send message pop-up opens, where you can customize the email. You will want to ensure that your sender name, sender email, and subject line are set to what you want.
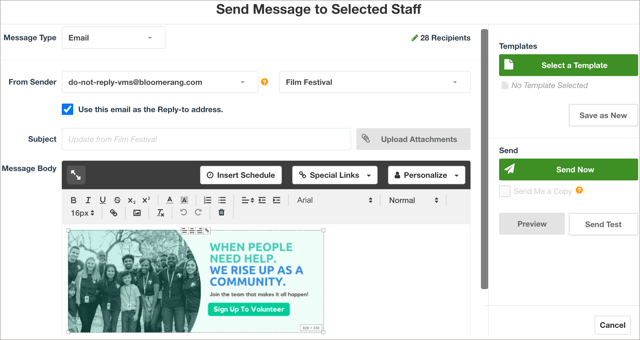
Next, create the message and include the special links or personalization fields for the invitation links you want to use. There are best practices for using both of these methods, so let's look at them both.
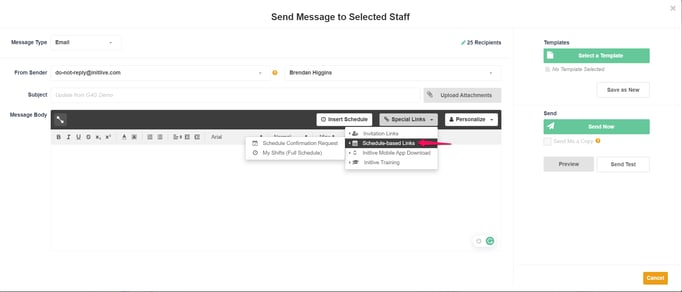
Step 3: Schedule Special Links
There are two types of Schedule Special Links that can be added to a message. Managers can add in a Shift Confirmation Request, and My Shifts (Personal Schedule) links that can be added to messages and templates in order to easily send volunteers scheduled-based custom messages. Both of these links are found under the Special Links dropdown under Schedule-Based Links.
When using the Shift Confirmation request link, it will send within the context of the Opportunity you are sending it from. If you are sending the Shift Confirmation from the Organization, once you press the send message button, you will receive a pop-up to confirm which Opportunity or which date range you wish to send out the Shift Confirmations for.
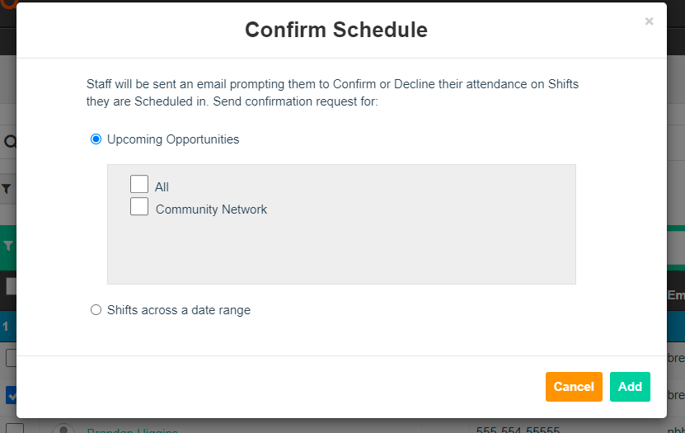
The Shift Confirmation link can be added to templates to be used across Opportunities or at the Organization level by different Managers if desired. Using the Shift Confirmation Special Link is very useful for Managers because the message always sends within the context of the Opportunity or prompt for confirmation on what to be included at the Organization level.
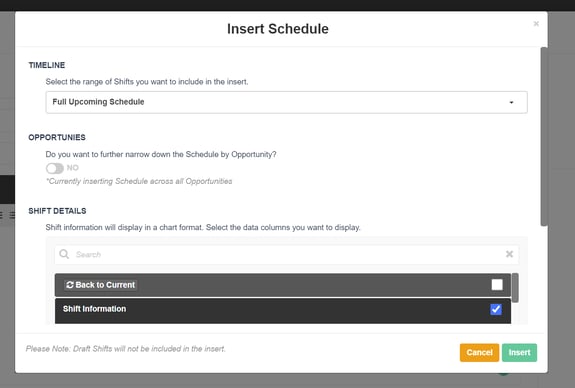
Step 4: Insert Schedule
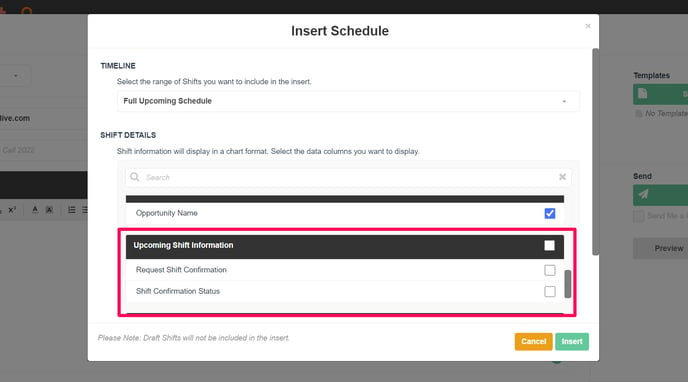
If you are looking to send out a Personal Schedule to volunteers, this can be done via the Insert Schedule option in the send message pop-up. When using the Insert Schedule option, Managers are able to customize the date range for the Shifts as well as which Shift based columns will be displayed.
For example, if you only want to send the following weeks Shifts to all Volunteers selected, then you can choose that option and then decide on how much info you want to present to the volunteers. By choosing the correct columns, the volunteers are presented with the most important information about their shifts.
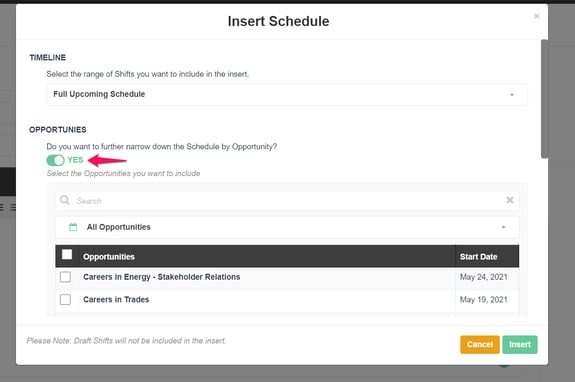
When sending messages from the Organization level, the Manager can choose which Opportunities to include while using the Insert Schedule. If you are running multiple Opportunities at the same time, this feature ensures that the volunteers see every Shift they have signed up, or been assigned to.
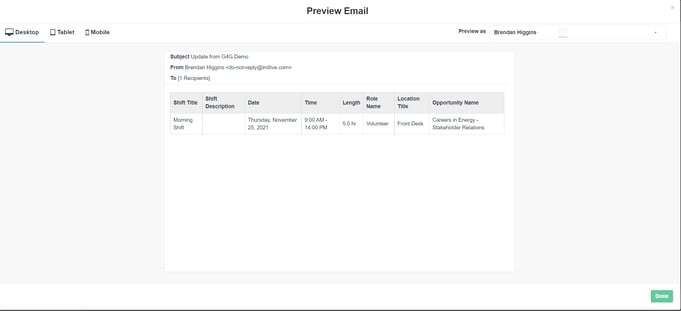
After configuring exactly what you want included for the Insert Schedule, preview the message to make sure that everything required has been included in the message.
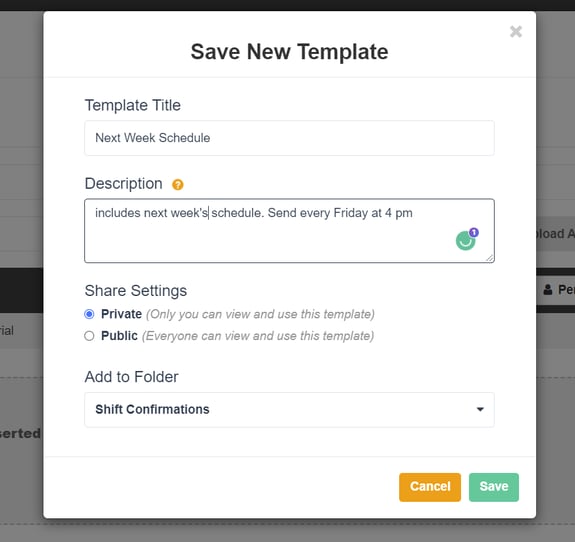
If this is a message that will be sent regularly, you can save it as a Template to easily send out the next week's Shifts every Friday without having to re-create the entire message.
Step 5: Sending Shift Confirmation Requests
When inserting the Schedule there is the option to also send Shift Confirmation requests at the same time. While selecting which columns to be included on the insert Schedule, managers can also choose to request a Shift Confirmation in that email. When requesting a Shift Confirmation via the send message, volunteers are able to Confirm or Decline their Shifts directly from the email without having to log into the system.
Whether they Confirm or Decline the Shift, another browser tab opens to confirm the action. If they are Declining the Shift, they are prompted to enter a reason. If a user attempts to Confirm or Decline a Shift they have already responded to, a tab opens informing them and instructing them to sign in if they need to change their response.
Step 6: Review Before Sending
Once you have gone through and added all the text, Special Links, and Personalization Fields, and Inserted the Schedule, review the message using the preview feature. You can also send yourself a test to ensure everything is how you planned it. When looking at the preview, you can see what the email will look like on a desktop, tablet, or mobile phone and select from the list of recipients to see the email with Personalization Fields filled out.
Related
Send Custom Invite Email Messages