-
Getting Started as a Volunteer
-
Getting Started as an Administrator
-
Managing Your Organization (Administrator)
- Public Page
- Volunteers
- Form Questions
- Applications and Background Checks
- Opportunities
- Languages & Translation
- Salesforce Integration
- Bloomerang CRM Integration
- Organization Qualifications
- Reports
- Signup Workflow / Recruitment
- Tags
- Email Templates
- Personalization Fields
- Email Communications
- Measure Volunteer Impact
-
Managing Your Opportunity (Administrator)
- Public Page
- Form Questions
- Signup Workflow / Recruitment
- Volunteers
- Opportunity Settings
- Roles
- Qualifications
- Venues & Locations
- Groups
- Availability
- Attendance Tracking
- Reports
- Languages & Translation
- Hours Worked / Service Time Tracking
- Tags
- Email Templates
- Personalization Fields
- Email Communications
-
Managing Your Schedule (Administrator)
-
Using the Mobile App (Administrator)
How do I create a Role?
Create roles for your Opportunity and assign them to specific volunteers.
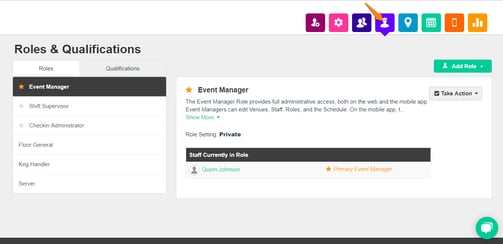
To create new Roles, navigate to the 'Roles & Qualifications' tab in your Opportunity.

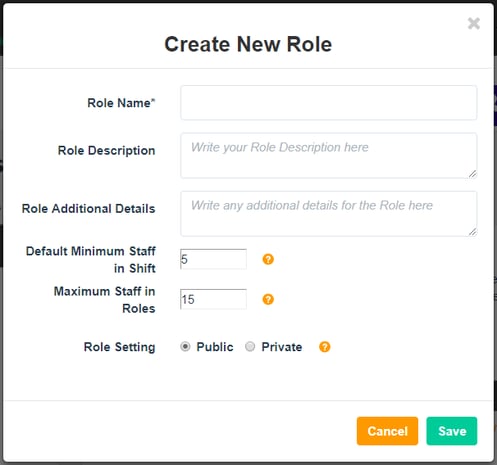
To create a new, custom Role click the 'Add Role' button. You will have the option to create a new Role or copy Roles from another Opportunity. Creating a new Role will prompt you to enter some basic information such as the name, minimum and maximum amount of Staff to fill the Role, and the Role Setting. The Role Setting will determine if volunteers can select the Role themselves (public), or if it will have to be appointed by an Opportunity Manager (private). When you're done, just click 'Save'.

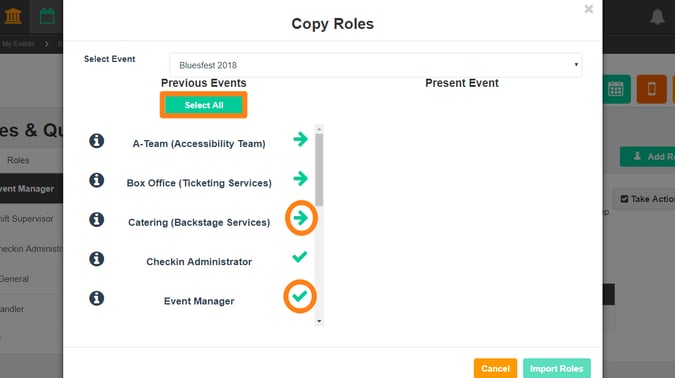
If you would like to copy Roles from another Opportunity, select which Opportunity to copy from and then select which Roles you would like to import. The arrow shows Roles that can be copied over and you can select them by clicking on that arrow, or, you can click 'Select All' to copy all of the eligible Roles. The check-mark means the Role already exists in your Opportunity and does not need to be copied.

