%20copy.png?height=120&name=Bloomerang-Volunteer-White%20(1)%20copy.png)
Managers can create custom PDFs using Volunteer List CSV exports with either Word/Excel or Google Docs/Sheets
Word/Excel
Using the export to CSV feature, Managers can make custom PDFs using data merging. This process involves using Excel and Word to create these custom documents.
Step 1
To start off the first thing to do is to download the CSV file from either the Organization or Opportunity Volunteer lists. If downloading from the Opportunity level the export feature allows the Manager to only export the columns that they will need for the document. If done at Organization level it will include all columns, which can be edited down in Excel if needed.
Step 2
Now that the CSV has been downloaded the next step is to either create a Word Doc to merge the data into or use a template (insert link to our template if created). Before setting up the data merges, it is important to complete all editing and formatting for the document.
Step 3
Once the Word document is set up properly it is time to start configuring the data merge. The first step is to go under the “Mailings” header in Word and choose the Select Recipients options. This will open a dropdown menu with three options, the one to select is “Use an Existing List”, which will allow the Manager to select the CSV document that was exported. Once selected Word will automatically read the headers from the CSV file and they will be able to be used for the merge.
Step 4
Now that the Word Document is ready to start using the data from the CSV file specific fields can be set up to use the columns. Start by selecting the text in the document template that will be replaced by data from the CSV file and select “Insert Merge Field” from the header menu. This will present a list of all the column headers from the CSV file, select the one that needs to be inserted into this location. Repeat these steps for all required fields.
Step 5
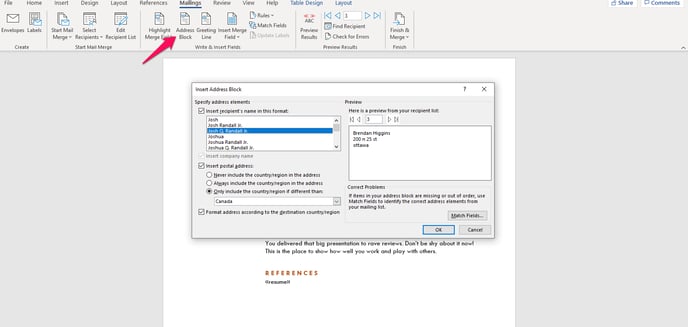
If an address field is required instead of selecting “Insert Merge Field” the Manager can select “Address Block” which will allow customizing all address fields in one step.
Step 6
Once all required fields have been setup with the data merge it is a good idea to preview the merged sheets by toggling the preview button in the header menu. Once the preview has been turned on all the pages can be cycled through by using the arrows buttons in the header menu. It is always a good idea to cycle through some of the pages to confirm that the info is displaying as intended.
Step 7
Now that everything is set up it is time to finalize the merge and create the files. This is done by selecting the “Finish & Merge” option from the banner menu which will give three options as to what to do with the documents that are going to be created. They can either be edited individually, printed, or emailed. To create PDFs of these documents the option to select is the ‘Edit Individual Documents” and once these documents are created they can be saved as a PDF.
Google Docs/Sheets
The export to CSV feature can be used to use Volunteer list data in creating documents and PDFs of the volunteers that are a part of the Organization or Opportunity.
Step 1
To start off the first thing to do is to download the CSV file from either the Organization or Opportunity Volunteer lists. If downloading from the Opportunity level the export feature allows the Manager to only export the columns that they will need for the document. If done at Organization level it will include all columns, which can be edited down in Google Sheets. Once the CSV file has been downloaded it will need to be uploaded into Google Drive to be able to use it in Sheets.
Step 2
In order to use the data from the exported CSV file a Google Doc will need to be created as a template for the data to merge with. When setting up this template insert tags will need to be used. These tags will be the column headers from the CSV file that was exported from Bloomerang Volunteer (ex. <<First Name>>). Once this document has been created it can be reused and easily edited for future merges.
Step 3
In order to match the CSV export to the insert tags on the Google Document that was created in the last step an add-on will need to be downloaded. There are several free add-ons that are available and can be searched when selecting “Add-ons” and then choose ‘Get Add-ons”.
While there are several Add-ons that can be installed, we recommend using Auto-Crat to perform these tasks.
Step 4
Now that the add-on has been installed it is time to perform the actual merge of data. This will require that the CSV export of the Volunteer list be open in Google Sheets.
-
Select Auto-crat from the Add-ons list and choose “Open”
-
Select “New Job” in the bottom right corner of the Auto-crat pop-up and choose the name for this merge. This job will be saved and be able to used quickly again at anytime
3. Press “Next” and select the Google Doc that is being used as the template to merge into. This is the Doc that was created with insert tags in Step 2. Any previous used templates will also display here to select them quickly.
4. Select the column headers from the Google Sheet to map to the insert tags from the Doc template. This is where any discrepancies or mismatched tags can be fixed before creating the PDFs.
5. Once the fields are matched it is time to click next and select the type of output for the documents that will be created. There is a choice between either Google Doc or PDFs, as well as whether to create multiple documents or have everything in one document. This is also where the file name for the exports is set.
6. Next is to set the folder location where these created documents or PDFs will be saved to. As a best practice make a folder to keep all these created files in one location.
7. The next two steps within the Auto-crat pop-up will allow for optional settings to be used. These are to set optional conditions on the merge, they are not necessary but can be used to create even more custom documents.
8. The final step is to choose whether to set triggers for this action to happen automatically and save to complete the process. If there are any issues with what has been selected up to this point Auto-crat will notify you and direct you to what needs to be fixed.
9. Once all errors have been resolved and the job has been saved it is time to run the actual merge. After saving the job Auto-crat will go back to the “job” screen which will now show the new job that you have setup. Select the ‘run” button and all the PDFs or Google Docs will be made and appear in the designated folder.